Learn the basics of this foundational yoga pose, Virabhadrasana I.


Virabhadra's Pose is also known as the Warrior Pose (there are three variation of Warrior, of which this is customarily numbered I). It may seem strange to name a yoga pose after a warrior; after all, aren't yogis known for their non-violent ways? But remember that one of the most revered of all the yoga texts, the Bhagavad-Gita, is the dialog between two famous and feared warriors, Krishna and Arjuna, set on a battlefield between two great armies spoiling for a fight.
What's really being commemorated in this pose's name, and held up as an ideal for all practitioners, is the "spiritual warrior," who bravely does battle with the universal enemy, self-ignorance (avidya), the ultimate source of all our suffering.
Warrior I Pose: Step-by-Step Instructions


Step 1
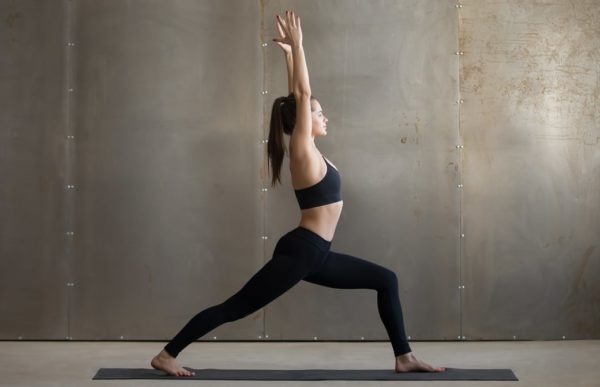
Stand in Tadasana (Mountain Pose). With an exhale, step or lightly jump your feet 31/2 to 4 feet apart. Raise your arms perpendicular to the floor (and parallel to each other), and reach actively through the little-finger sides of the hands toward the ceiling. Firm your scapulas against your back and draw them down toward the coccyx.
Step 2
Turn your left foot in 45 to 60 degrees to the right and your right foot out 90 degrees to the right. Align the right heel with the left heel. Exhale and rotate your torso to the right, squaring the front of your pelvis as much as possible with the front edge of your mat. As the left hip point turns forward, press the head of the left femur back to ground the heel. Lengthen your coccyx toward the floor, and arch your upper torso back slightly.
Step 3
With your left heel firmly anchored to the floor, exhale and bend your right knee over the right ankle so the shin is perpendicular to the floor. More flexible students should align their right thigh parallel to the floor.
Step 4
Reach strongly through your arms, lifting the ribcage away from the pelvis. As you ground down through the back foot, feel a lift that runs up the back leg, across the belly and chest, and up into the arms. If possible, bring the palms together. Spread the palms against each other and reach a little higher through the pinky-sides of the hands.
Keep your head in a neutral position, gazing forward, or tilt it back and look up at your thumbs.
Keep your head in a neutral position, gazing forward, or tilt it back and look up at your thumbs.
Step 5
Stay for 30 seconds to a minute. To come up, inhale, press the back heel firmly into the floor and reach up through the arms, straightening the right knee. Turn the feet forward and release the arms with an exhalation, or keep them extended upward for more challenge. Take a few breaths, then turn the feet to the left and repeat for the same length. When you're finished return to Tadasana.


Contraindications and Cautions
- High blood pressure
- Heart problems
- Students with shoulder problems should keep their raised arms parallel (or slightly wider than parallel) to each other.
- Students with neck problems should keep their head in a neutral position and not look up at the hands.


Modifications and Props
Beginners find it very difficult to keep the back heel grounded and the lower back lengthened in this pose. As a short-term solution, raise the back heel on a sand bag or other height.
Beginner's Tip
When the front knee bends into the pose, beginners have a tendency to tip the pelvis forward, which duck-tails the coccyx and compresses the lower back. As you perform step 2 in the main description above, be sure to lift the pubis toward the navel and lengthen the tail toward the floor. Then as you bend the knee, continue to lift and descend these two bones, keeping the top rim of the pelvis relatively parallel to the floor.
Benefits
- Stretches the chest and lungs, shoulders and neck, belly, groins (psoas)
- Strengthens the shoulders and arms, and the muscles of the back
- Strengthens and stretches the thighs, calves, and ankles
Variations
This pose can be performed with the arms in various positions. For example, go through steps 1 to 3 as described above, except with your hands resting on your hips. Then, once the forward knee is bent, swing your arms around behind your torso and clasp your hands. Stretch your hands away from the back torso and lift your chest. It's acceptable to squeeze your scapulas together at first, but be sure, once the chest is lifted, to push them away from the spine. To leave the pose, reach back with your hands and, with an inhalation, "pull" yourself up, straightening the front knee.
댓글
댓글 쓰기